It is very frustrating when a phone dances around network modes. The phone is browsing smoothly, and in a split second, it stalls. You check the notification bar and see that the 4G icon has switched to 3G, or the 3G icon down to EDGE. Then it switches back to 4G, then 3G again. You get the picture. This merry-go-round continues, which can be very annoying. Today we look at a working tip on how to peg Android phone to 3G or 4G.
Phones running stock (or close-to-stock) versions of Android always have this issue. You can’t fully peg to a particular network mode. The incessant flipping through networks also takes a toll on your phones’ battery life. For a while now I’ve been with the Bluboo Maya Max (review and specs) and this same issue is prevalent on the phone. GLO network was just bouncing around 3G and 2G (it doesn’t support Glo’s 4G network). Here’s how to stop this.
How to peg Android phone to 3G or 4G
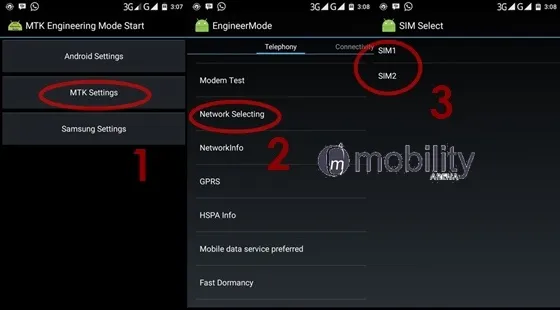
- Download and Install MTK Engineering Mode APK HERE.
- Open the app and select “MTK Settings”.
- Scroll down and click on “Network Selection”.
- Next, you select the SIM you want to peg its network. That is, pick the SIM you use for data.

- Set your preferred network type. This is where you actually peg the phone to whatever network mode you want.
Note that this tip works for only Androids running a MediaTek chip. You can use it to peg your Android phone to 3G or 4G, depending on what networks it supports. You cannot peg to 4G if your phone does not support 4G.
Do you have an alternative method of pegging an Android device to a particular network type? Please do share.
- Don’t miss our reviews.
- Follow our news on Google News.
- Join our WhatsApp Group, to be notified of the most important articles and deals,
- Follow us on Instagram, Facebook, Twitter, and YouTube.
